Hey lovelies! It's time for Stephanie from A Little Polish to take over my blog. We met over a year ago in the Nail Challenge Collaborative, where we got to bond over each other nail art. I love what she prepared for you ladies and will definitely give it a try. Thank you Steph!
***
Karine asked me to share with you my favorite type of nail art so I knew exactly what I wanted to do. If you read my blog you know it as a striped gradient, but I have also heard people describe it as tie die/drip mani.
This is the final look, but let me show you how I got there so you can do this for yourself, and trust me, its SUPER easy so everyone can do it.
For this mani, you need between 3-4 polishes (I prefer opaque colors), striping nail art brush or small brush from your normal polish and a topcoat. I have used 4 colors for this version, but you can check out a 3 color version here.
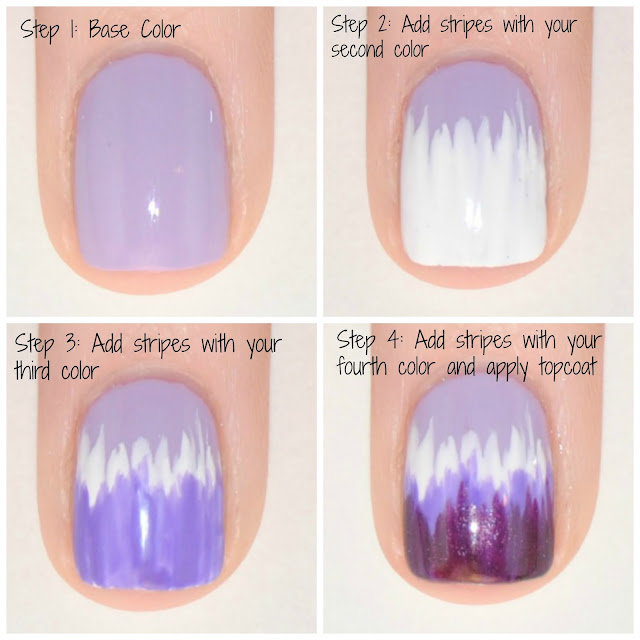
Step 1: Apply a base coat all over. I like to start with one of my lighter colors so that the rest of the colors show up well. In this case, I used Sally Hansen, Lacey Lilac:
Step 2: With your striping brush/striping polish, apply your second color in thin lines over about 2/3's of the nail. I like to include white in my striped gradients, so I used Kiss, White:
Step 3: Apply your third striping color in random thin lines over about 1/2 of the nail. For this mani, I used Funky Fingers, Cheshire:
Step 4: Apply your fourth and final color on the bottom 1/3rd of your nail. I like to let this be the darkest color, but it really doesn't matter. I used OPI, Linkin Park After Dark. Once you have your final color on, clean up around the nail if needed and use a topcoat (I used Out The Door)
What I really love about this look is that is gives a super cool effect without being difficult to execute and since the stripes are random, precision isn't required. I always get lots of compliments when I wear this nail art out.
Here is a step by step tutorial for when YOU try this mani:
I want to thank Karine again for having me as a guest blogger and I hope you enjoyed this mani. If you end up trying it out, please share it with us!


This is such a cool look, I will definitely be trying it!
ReplyDeletePretty! I am so gonna try this! :D
ReplyDeleteWhat an awesome look! I love it so much:)
ReplyDeleteThanks for having me guest post! Hope you're having a fun time on holiday!
ReplyDeleteThank you! I loooove your design
DeleteLove the simplicity of this design! I need to try it out now :)
ReplyDeleteSo cool!! You make it look so easy! I definitely have to try this :)
ReplyDeletesoo awesome <3
ReplyDelete